Thursday, May 30, 2013

Building The Ultimate DIY Slider | A Trip to DIY Heaven

[If you are new to this blog article series, click here to read the previous article.]

So I took one day return trip to India's DIY Heaven, by that I mean Mumbai's product oriented market streets, specifically Lamington Road for all the electrical components and Nagdevi Street for mechanical components.

I had already received the main items from US, the Servo City's DMSC and DP's DollyShield DIY Kit, but I needed few more main items and components to piece everything together. So here are the things that I got from this trip to heaven;

Tools and items required to solder the DollyShield DIY Kit:


From the above image, starting from top left to bottom right I got;

1x Solder Wire with Flux
1x Solder Iron Stand
1x Wire Stripper
1x Nose Pliers
1x Wire Cutter
1x Digital Multi-meter

You must be wondering where is the Solder Iron itself, well that I am borrowing from a friend.

Arduino UNO Rev3:


Without the Arduino board the DollyShield Kit is like a PC without a Processor. In order to complete the MX2 controller using DollyShield Kit, remember it is a SHIELD, it has to be mounted over the Arduino UNO Rev3 or Dueminalove and install the firmware from DP's site, to bring it to life. I loved those swag stickers they give with the Arduino to brag that its your custom modded DIY project powered by Arduino. Haha!

Switches, Cables and Jacks:


2x Limit Switches:


I got these Plunger Type Limit Switches in order to stop the Slider's carriage when it reaches the end of the rail.


2.5mm to 3.5mm TRS Cables, Extensions and Adapters:


Will be using these cables to connect the Limit Switches to the MX2 Controller via the 2.5mm TRS Ext-1 port.

2x DC Barrel Jack Couples:


Will be using these to easily switch the motor connection between the two controllers as per my requirement of Real Time Video and Timelapse. Also to power both the controllers simultaneously using the Tekkeon Portable Battery.


Motor, Timing Belt and Pulley:


12V DC Square Gear Motor:


I initially wanted a 60 RPM 12V DC Square Gear Motor having 12.5kg-cm or higher torque, when I went to the shop on Lamington road, most shops did not have a 60RPM motor in stock, but then I found a better motor, the one above in picture is a 100RPM with 20kg-cm torque, but I won't believe the seller's word, so even if the motor gives half the torque as said, it will still work for me.

Timing Belt and Pulley:


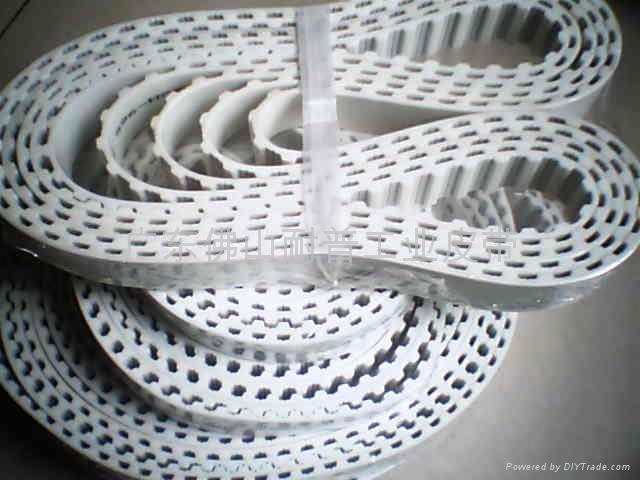
It turns out that the normally preferred HTD-5m, 9mm wide rubber belt is quite costly in India, due its low requirement, the shop that I went to on Nagdevi Street, suggested another belt type called XL, made of PU material, which would just work the same as HTD, HTD is rated for a lot extreme load conditions, which are not required in my case as the load is not of that range, XL belt is sufficiently strong enough to for my case, it is affordable and its pulley's too are easily available and inexpensive. So I got a 2.5m Open Belt of XL type, 9mm wide and a 26 tooth aluminium pulley for the same as shown below.


So now I have most of the things needed to start fabricating the project. My next steps will be;
  • Assemble the DollyShield Kit.
  • Attach it to Arduino and load firmware.
  • Test it with motor, limit switches and battery.
  • Purchase or build a slider system.
  • Figure out how will I mount the Belt, Pulley and Motor on the slider system.
  • Design a ergonomic case for the controllers and make the whole system easy to switch between Video and Timelapse Mode.
  • Test the slider out.
According to that my next article will be just on Assembling the DollyShield Kit.

One more thing, there is a surprise feature that I will be adding to this already Ultimate Slider, if its successful then it will be revealed in the test video.

Until then stay stoned!

Shivam.

Sunday, May 26, 2013

Building The Ultimate DIY Slider | The Plan

For those who don't know, a Slider is a contraption used in film industry to move the camera in a linear direction, its a bit different from camera dolly, if you see movies carefully, you may have noticed a scene where the actor is saying a dialogue and the camera is slowly moving sideways or forward, this is achieved by using a Slider, it adds the extra dynamics to the shot. To know more, watch this funny video below by Film Riot;


The best professional ready to use sliders out there are very expensive and mostly made in US, and for people like me who live in India, importing is a pain due to 30% custom duty and heavy shipping charges.
So this year I have set forth a goal to build the Ultimate Do-It-Yourself Motorized Slider using my Mechanical background and learn some electronics on the way with guidance from a friend, Abishai Dmello, who is into electronics. Basically I am aiming at one slider that has all the following features;
  • Manual control when needed - No matter how much automated\motorized it is, it should always allow me to operate it manually using my hands to move the slider.
  • Simulation of hand movement and speed - Whatever the motorization mechanism is, it should be able to move the slider fast enough for real time videos and should be able to ramp the speed instead of constant speed.
  • Vertical operation - The mechanism should have enough torque to operate when the rail of Slider is vertical in position
  • Light in weight - The Slider should have optimum weight so it can be transported easily.
  • Proper length - The length of slider must be long enough to achieve desired linear movement, and short enough to fit easily during travelling.
  • Timelapse Friendly - The mechanism should be able to simulate move-shoot-move motion to use it efficiently for capturing holy grail timelapses.

So to achieve the above features in a single slider, I decided to have the following provisions made in my design;
Digital Manual Speed Controller
  • For manual control when needed - a simple solution to detach the driving mechanism from the slider carriage.
  • For simulation of hand movement and speed - use a 12V DC Gear Motor that gives 60RPM Speed and control it using Servo City's - Digital Manual Speed Controller.
  • For vertical operation - the operating torque of motor should be 12.5kg-cm or higher, in my case, as the gear I will be using will not be greater than 5kg.
  • For light in weight - i will be using aluminium based material.
  • For proper length - it seems that 3ft of slider length is sufficient to satisfy that.
  • DollyShield DIY Kit
  • For Timelapse Friendly - i will be using Dynamic Perception's - DollyShield DIY Kit with Arduino Board to control the motor for move-shoot-move motion.
Yesterday I received the first few key items that I need to build this Slider system, they all are available in US only, I had ordered them a month back, and a friend's father who works in US brought them to me on the way back to India for vacation. The items are as follows;

Dynamic Perceptions's DollyShield DIY Kit:


As you can see above, the kit basically consists the stripped components of Dynamic Perception's MX2 Controller without the Arduino Board, which we have to buy separately. The whole kit is a DIY, you will have to solder all the components to the PCB and then attach a Arduino Dueminalove or Uno Rev 3 to complete the controller.

The controller gives the following features;
  • Two- or Four-Axis Motion Control - The MX2 supports two DC brushed motor axes directly using the built-in motor drivers.  An additional two axes of motion in pan and tilt can be added simply by hooking up a Merlin Telescope Head to the MX2.

  • Integrated Camera Control - Hook any camera with a supported remote cable up to the MX2 and start shooting motion-integrated timelapse videos right away.  No need for additional intervalometers or other electronics to synchronize the camera with the motion.  Control every aspect of the exposure, including auto-focus and exposure on-camera or controlled by the MX2.

  • Advanced Motion Capabilities - The MX2 can run all axes of motion in both continuous and interleaved (shoot-move-shoot) modes.  Complete control of the output motion including ramping/feathering in the output video and delayed lead-ins are possible with the MX2.
  • Power-Saving Features - Auto-dim the screen, or disable it completely on a timer to reduce power draw when shooting in the field.  Advanced motor control reduces power draw during continuous motion moves.
  • Auxiliary Inputs / Outputs - Interact with your environment, integrate with other systems and expand your capabilities.  The MX2 is ready to take inputs and make changes to the program on the fly based on triggers from external sources.  Switches, relays, and more can be used in conjunction with the MX2.

  • Open-Source - The MX2 is built around open-source electronics and firmware.  Hack it, mod it, change the code, add new features - it's yours: you are free to experiment.

Servo City's Digital Manual Speed Controller (DMSC):


This device is a ready to use Speed Controller for precisely controlling a DC Gear Motor's speed in both directions (Forward\Reverse). It has a potentiometer that enables manual ramping of speed, so we can move the camera at constant speeds as well as stop\start the movement smoothly\gradually\variably . It can operate any DC Motor that requires 6-16 Volts of DC Voltage to operate, the power  can be supplied through two ways, tamiya connectors or DC Barrel Power Jack.

Tekkeon myPower ALL Plus MP3450i Battery (5-19V):


Well its obvious that I need something that can power the device that I am building, so I chose this portable battery, its just perfect for my purpose as it provides 5-19 Volts of DC Voltage, its a Lithium Battery that means less recharging time and more battery backup. It has two outputs, one that gives the desired voltage from 5-19V and another which is a USB port that provides 5V for charging cellphones and other devices.
So if I am not using this battery for Slider, I can use it to power many of my other devices like Tascam DR-60D, Cellphones, Laptops etc.


To put the whole idea of this DIY project in simple words, I am building a motorized slider to control the linear movement of camera for both Real Time Videos as well as Timelapse Sequences, using Servo City's DMSC for variable speed in continuous motion and Dynamic Perceptions DollyShield DIY Kit for interleaved motion (move-shoot-move) and power the whole set up using the Tekkeon MP3450i portable battery.

In next article I will cover the mechanical design of the Slider, which Rail and Carriage Assembly I will be buying, and other list of items that I need to piece the whole project. [*Edit: Click here to read the next article in this series.]

Till then stay stoned!

Shivam.

Saturday, May 25, 2013

When Mahindra Thar Goes Off Road, Dust Does Not Simply Settles Down!

Few months back, in January 2013, I was hired by Western India Sports Association to shoot an event, the Off-Roading Trophy 2013 by Mahindra Adventure, held at a open plot besides the Mahindra R&D Plant near Igatpuri. You can watch the video here;


I was really excited, as I like cars, especially the mighty SUVs and 4x4 Off Roading vehicles, and I knew that as much challenging it was for the contestants to overcome the hurdles, it was equally challenging for me to capture them in action. I kept my rig simple and light in weight, as I knew the event would be running from morning to evening under harsh sunlight, so I used my 5D Mark III (Missed the GoPro a lot here.) with only one standard zoom lens, Tamron 28-75mm f2.8, to cover the whole event, to avoid frequent changes. I took 90% shots in hand-held\run&gun style using the shoulder rig to avoid vibrations\jerks and give it a 'action' feel, I completely avoided tripod during main event to eliminate wasting energy in mounting\dismounting and carrying the heavy tripod here and there. Shot mostly in 1080p at 25fps and some high action shots in 720p 50fps for slow motion (though the editor did not use it the way I imagined.)

One of the major challenge that I did not think of in advance and had to face during covering this event was dust! Fine-dry-red-devil DUST! As the land there was dry, deserted and dusty, and on that the gigantic 4x4 tires of Thar's rolling at high speeds, every time the vehicle was overcoming the hurdles it felt like an Apache has landed there, dust storm every where around the vehicle, which ultimately settled on me and my camera. The matte black surface of 5D looked like the surface of a old parked car that was not used for ages, but this happened on my 5D in just few seconds. So on Day 1 I experienced this challenge and applied some simple solutions to fight the dust and protect my camera from it as much possible on Day 2.

Here are the quick solutions (nothing fancy);
  • The moment the Day 1 ended, I cleaned my camera thoroughly.
  • On Day 2 I kept a cloth with me in my pocket to kept dusting the camera body as dust settled.
  • Also kept blowing air on the UV filter to blow off the dust so the image quality is not affected.
  • Used a LCD Viewfinder, as the dust settled on the screen made it difficult to watch under bright Sun.
Now there was dust and then there was this artificially made mud pit in one of the challenge, since i did not had any quick solution for that, i just stayed away from the area where the vehicle's tires were spraying the mud.

Here are some points that I learned on this shoot and will implement in future whenever face similar shooting conditions;
Rain Cover
  • Clean the camera before and after every shoot.
  • Use UV Filter to protect the lens glass.
  • Keep a rag\cloth handy to clean camera body whenever possible during shoot.
  • Don't use a cloth on a dusty UV Filter glass, just blow air on it to dust off.
  • In case there is going to be slight spray of water or mud during shoot I would suggest to get a camera rain cover.
  • If using your camera more than frequently in such conditions, then do full periodic clean ups from experts.
And yes its not just about protecting your camera, the camera is nothing without its operator, so taking care of yourself is also important (trust me you don't want to get ill during the first day of shoot itself.). Here are some things that I would implement;
Hydration Pack
  • I would keep myself hydrated as much as possible. In fact get a hydration pack for more supply of water without any hindrance in the work.
  • Stay under shadow as much as possible.
  • Wear a fishing cap\hat and keep an umbrella handy.
  • Sun-screen of course.

Well i guess that is all I learned from the experience of this shoot, hopefully not missing something. Ah! Yes, this is the project where i lost my phone, the old Nokia 5700 express music, how can i forget that!


Anyways I hope this article helps some of the people preparing in advance for such shooting conditions.

Thank you for reading! (bcoz...genratn dis days is very lazy.....)
Stay stoned!

Shivam.

Friday, May 24, 2013

Magic Lantern Enables 14-bit Raw Video recording on 5D Mark III

Being proud owners of 5D Mark III, this news makes us more proud than we already are. The guys at Magic Lantern[ML] have discovered that the already famous and more-powerful-than-as-marketed camera, the Canon 5D Mark III is capable of shooting 14-bit 4:4:4 RAW Continuous Full HD Video. This features gives a huge relief to those 5D owners who wanted to get the BMCC camera's for their RAW Video feature in the same price range. But there are some downsides to this added feature on the 5D. Below are the pros and cons of shooting RAW on 5D Mark III using ML;

Pros:
  • Far better quality than the original H.264 footage.
  • Image quality is similar to other RAW Video shooting cameras like BMCC, RED, ARRI etc.
  • Better Dynamic Range.
  • RAW Footage from a Full Frame Sensor famous for its low noise performance.
  • All the above features in a very compact body.
Cons:
  • Huge file size due to no compression.
  • Fast and costly 1000x UDMA7 CF Cards required to shoot 1920x1080 without dropping frames at 24p.
  • A bit longer and complex workflow. (This is excusable for the image quality we get.)
After gauging the Pros and Cons we can say that this feature is VERY useful in limited scenarios of shooting a project. The best thing is that it doesn't costs to add this feature to your camera as ML is open source.
Having a RAW Video recording feature when needed on the same body you own is far better than not having it and eliminates the need of purchasing or renting a RAW Video camera separately for specific shoots.

All you need to do to covert your 5D Mark III into a RAW Video shooting camera is to install  Magic Lantern Firmware (For now developers version or wait for some time for the stable public release) and purchase some high capacity fast CF 1000x UDMA7 Cards.


What about the risk of burning your camera?

Well on that we say only one thing, go here, 5D Mark III Raw Video Collection and you will see almost 135+ people have successfully risked their precious cameras for successfully testing the RAW Video feature, if their cameras did not burn, neither will yours, unless you do something wrong.

The actual logical reason behind why the camera is not overheating while recording RAW is that the camera is not doing an extra effort, it is just storing the already available RAW Stream from the sensor directly to the CF card. The camera in fact is saving more power by doing less efforts of processing the RAW stream in camera and converting it into compressed H.264 footage.

Soon we are going to test this feature on our own camera, till then stay stoned!

Wednesday, May 22, 2013

Welcome!

Welcome to Stoned Eye's Blog, as you know we grow high quality weedeos on YouTube, then why did we start a blog? Well here you will see how we make them, what gear we use, what we learn from our mistakes, some of the DIY stuff we build, and also some tips & tricks for beginners.
Make sure you subscribe to the blog for some interesting articles.
Thank you for visiting!

Regards,
Stoned Eye Team.